Tutorial: Advanced automation and GameDriver tools tutorial with StackOBot
Note: This is a continuation of the previous tutorial found here. Please go through it first for steps on setting up GameDriver.
We will proceed to automate testing another puzzle in this tutorial.
Goal - Automate the door puzzle, but we walk up to the switches like a normal player would.
To open the door, we first need to activate these two switches. 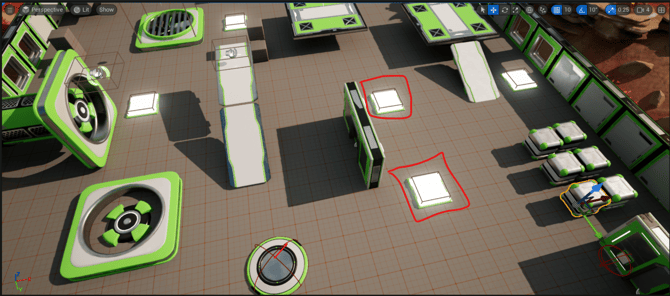
We will start with the switch on the far side first. We need to perform a sequence of actions to reach the switch.
Step 1 - Turn towards the crates, move forward, and stop once the player is within proximity of the crates.
Section titled “Step 1 - Turn towards the crates, move forward, and stop once the player is within proximity of the crates. ”To grab the position of the Crates using a GetObjectPosition api call, we first need to grab the object HPath from the outliner. The GameDriver plugin adds a right-click menu option enabling this.
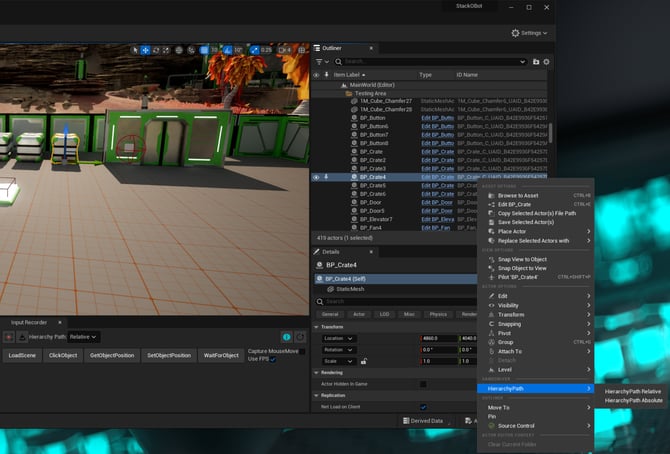
Vector3 cratesPos = api.GetObjectPosition("/BP_Crate_C_UAID_B42E9936F54257D500_1757448073");Now we can write the test code to achieve step one.
LookAtCrates();
//Move towards the crates
api.KeyPress(new KeyCode[] { KeyCode.W }, 0); //keydown frames 0 - KeyDown hold until the next call.
//Wait until the player reaches close to the crateswhile (!IsAt("//BP_Bot_C_0 ", cratesPos,new Vector2(350,150)));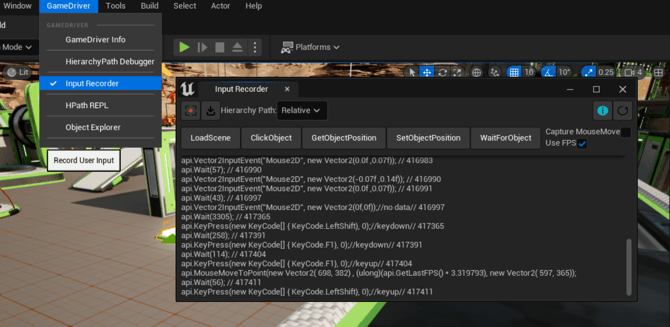
//Stop movingapi.KeyPress(new KeyCode[] { KeyCode.W }, 0); //keyupLookAtCrates() is a helper method. It uses a Vector2InputEvent api call to orient the player camera towards the crates.
It is a high-precision api call, which can reproduce even minute changes in mouse position. So it is always best to use the GameDriver Input Recorder to capture these types of input.
The Input Recorder can be accessed by navigating to the GameDriver menu -> Input Recorder
*** ***IsAt() is another helper method that uses GetObjectPosition api calls to check if an object is within the proximity of another on the x-y plane.
//Example codeapi.Vector2InputEvent("Mouse2D", new Vector2(0.14f, 0.07f));Full method implementation will be available in the full script attached at the end of the tutorial. Now let’s continue!
Step 2 - Turn left towards the switch and keep moving until the player is on the switch.
Section titled “Step 2 - Turn left towards the switch and keep moving until the player is on the switch.”LookAtSwitch1();
//Move towards Switch 1api.KeyPress(new KeyCode[] { KeyCode.W }, 0); //keydown
//Wait until the player reaches the buttonwhile (!IsAt("//BP_Bot_C_0 ", switch1Pos, new Vector2(35, 65))) ;
//Stop movingapi.KeyPress(new KeyCode[] { KeyCode.W }, 0); //keyupSwitch1 position can be grabbed exactly as we did with the Crates in Step 1.
Step 3 - Press F, to disable the current bot and print a new one.
Section titled “Step 3 - Press F, to disable the current bot and print a new one.”//print a new bot (Press F)api.KeyPress(new KeyCode[] { KeyCode.F }, 20); //keypressapi.Wait(1000);Now we do the same for the other switch.
LookAtSwitch2();
//move to the Switch 2api.KeyPress(new KeyCode[] { KeyCode.W }, 0); //keydown
//Wait until the player reaches the button (Player HPath changes ater printing a new bot)while (!IsAt("//BP_Bot_C_1 ", switch2Pos, new Vector2(35, 65))) ;
//Stop movingapi.KeyPress(new KeyCode[] { KeyCode.W }, 0); //keyup
//print a new bot (Press F)api.KeyPress(new KeyCode[] { KeyCode.F }, 20); //keypressapi.Wait(1000);
Finally to conclude the test we need to validate that activating both switches opened the door in an Assert statement.
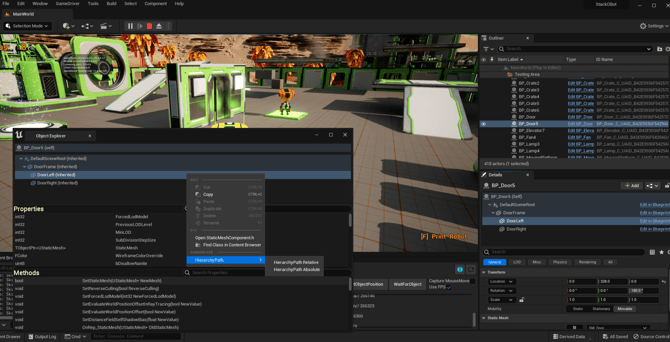
If you navigate back to the outliner and select the door, the details panel shows that the door has two child components - DoorLeft and Door Right. Activating the switches will translate the components along their y-axis (Opening the door). So we can use this to validate our test.
This is a good place to use the GameDriver Object Explorer tool. It can be accessed by navigating to the GameDriver menu -> Object Explorer
Object Explorer tool lets you grab HPaths to access properties and methods of an Actor and their components.
We need to grab the position of one of the two components.
We can now compare the y coordinates before and after activating the switches now that we have the required HPath.
Vector3 newLeftDoorPos = api.GetObjectPosition("//BP_Door_C_UAID_B42E9936F5429ADA00_2086828164/fn:component('DoorLeft')");
Assert.That(newLeftDoorPos.y, Is.Not.EqualTo(leftDoorPos.y), "Door not Open. Test failed!");
The complete test script is attached here for reference.